Create Token
Overview
The Create Token page provides a comprehensive multi-step wizard that guides users through the creation of custom fungible tokens on the Klever blockchain. The process includes token configuration, optional initial minting, and the ability to create a liquidity pool immediately after token creation.
Creation Wizard Flow
The token creation process consists of 5 steps with smooth animations between each stage:
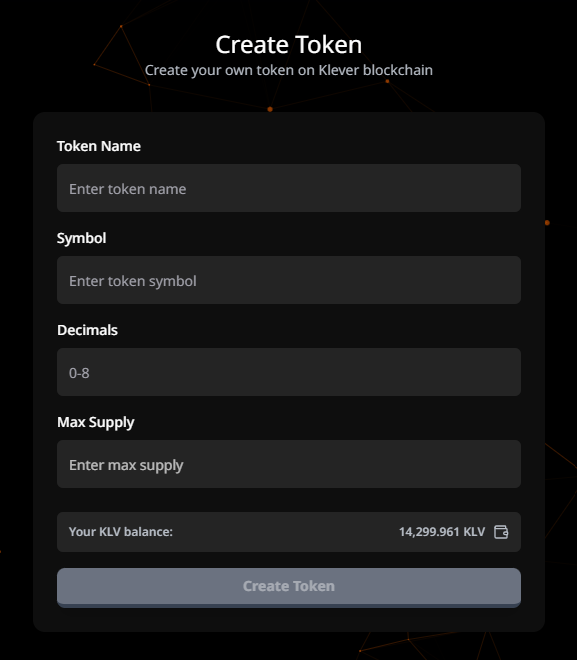
Step 1: Token Configuration Form
Page Title: "Create Token" Description: "Fill in the details to create your custom token"
Required Fields
Token Name
- Description: Full name of the token
- Maximum Length: 32 characters
- Validation: No special characters allowed
- Example: "My Custom Token"
Token Symbol
- Description: Ticker symbol for the token
- Maximum Length: 5 characters
- Validation: No special characters allowed
- Example: "MCT"
Decimals
- Description: Number of decimal places for token precision
- Range: 0-8
- Validation: Must be an integer
- Example: 6 (allows for 0.000001 token units)
- Note: Higher decimals provide more granular token divisions
Max Supply
- Description: Maximum total supply that can ever be minted
- Validation: Must be greater than 0
- Format: Numeric input with token precision
- Example: 1,000,000
- Note: This limit is permanent and cannot be changed after creation
Form Actions
- Create Token Button: Proceeds to next step after validation
- Real-time Validation: Immediate feedback on input errors
- Back Navigation: Return to previous page
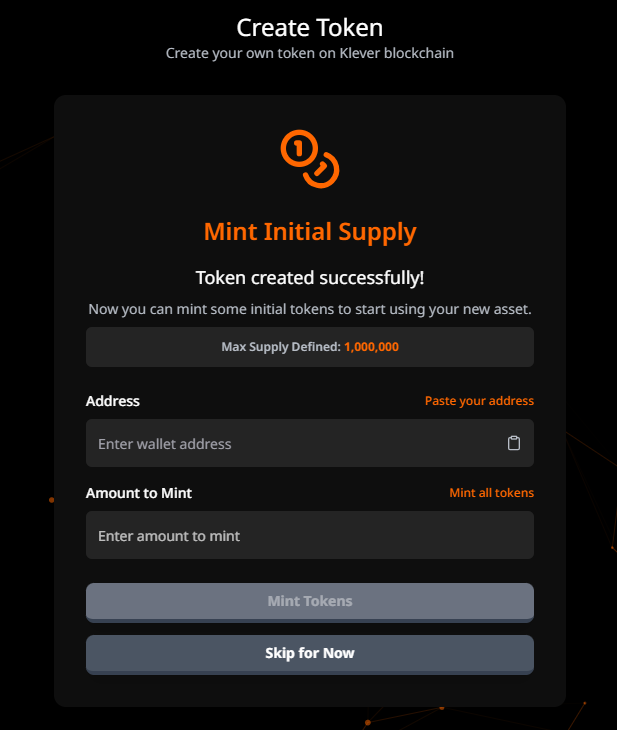
Step 2: Initial Minting (Optional)
Title: "Mint Initial Supply" Description: "Mint tokens immediately after creation or skip this step to mint later"
Fields
Recipient Address
- Description: Address that will receive the minted tokens
- Features:
- Auto-fill with connected wallet address button
- Clipboard paste support
- Address format validation
- Validation: Must be a valid blockchain address
Amount to Mint
- Description: Quantity of tokens to mint initially
- Features:
- "Mint All Tokens" button to automatically fill max supply
- Cannot exceed max supply defined in Step 1
- Validation: Must be greater than 0 and ≤ max supply
Action Options
- Mint and Continue: Proceed with initial minting
- Skip This Step: Create token without initial minting
- Back: Return to token configuration
Important Note: If you skip minting, you'll need to use the Token Manager to mint tokens later.
Step 3: Processing
Title: "Processing Transaction" Description: "Your transaction is being processed on the blockchain"
Features
- Real-time Transaction Monitoring: Live status updates
- Progress Indicator: Visual feedback of transaction progress
- Transaction Hash: Displayed when available
- Status Messages: Step-by-step transaction status
- Error Handling: Clear error messages if transaction fails
Transaction States
- Pending: Transaction submitted to blockchain
- Processing: Transaction being confirmed
- Success: Transaction completed successfully
- Failed: Transaction failed (with error details)
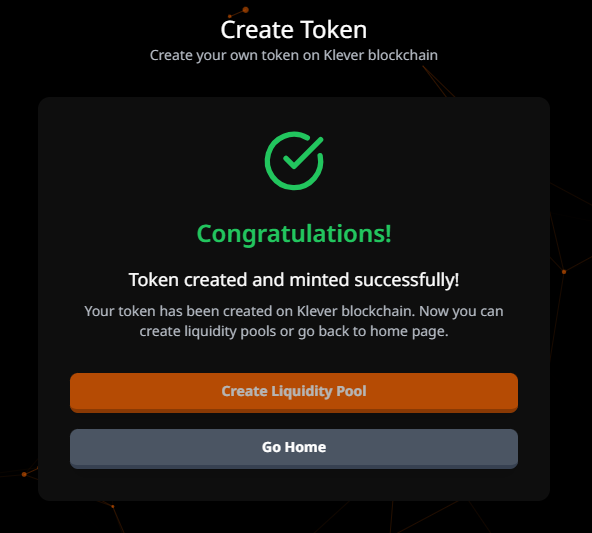
Step 4: Success
Title: "Token Created Successfully!" Description: Confirmation message with token details
Displayed Information
- Token Name and Symbol: Confirmation of created token
- Transaction Hash: Link to view on blockchain explorer
- Max Supply: Configured maximum supply
- Minted Amount: Amount minted in initial step (if applicable)
Next Steps
If Initial Minting Was Performed:
- Option 1: Create Liquidity Pool
- Button: "Create Liquidity Pool"
- Action: Proceeds to LP creation wizard
- Option 2: Go to Token Manager
- Button: "Manage Token"
- Action: Navigate to Token Manager dashboard
If No Initial Minting:
- Only Option: Go to Token Manager
- Button: "Go to Token Manager"
- Action: Navigate to Token Manager to mint tokens
- Warning Message: "You need to mint tokens before creating a liquidity pool"
Step 5: Preparing Liquidity Pool (Optional)
Title: "Preparing Liquidity Pool" Description: "Preparing to create your liquidity pool..."
Features
- Automatic Redirect: Redirects to LP creation after 8 seconds
- Progress Animation: Visual countdown indicator
- Skip Option: Manual button to skip wait and proceed immediately
Note: This step only appears if the user chose to create a liquidity pool from the success screen.
Validation Rules
Token Name
- ✅ Maximum 32 characters
- ✅ No special characters
- ✅ Cannot be empty
- ❌ Cannot contain emojis
Token Symbol
- ✅ Maximum 5 characters
- ✅ No special characters
- ✅ Cannot be empty
- ❌ Cannot contain spaces
Decimals
- ✅ Must be an integer
- ✅ Range: 0-8
- ❌ Cannot be negative
- ❌ Cannot be decimal
Max Supply
- ✅ Must be greater than 0
- ✅ Numeric only
- ❌ Cannot be negative
- ❌ Cannot be zero
Mint Address
- ✅ Must match blockchain address format
- ✅ Cannot be empty if minting
- ✅ Must start with proper prefix (e.g., "klv1")
Mint Amount
- ✅ Must be greater than 0
- ✅ Cannot exceed max supply
- ✅ Must respect token decimals
User Interactions
1. Creating a Token Without Initial Minting
- Click "Create Token" from Token Manager or navigation
- Fill in token details (name, symbol, decimals, max supply)
- Click "Create Token"
- Click "Skip This Step" on minting screen
- Wait for transaction processing
- Click "Go to Token Manager" on success screen
- Use Token Manager to mint tokens when needed
2. Creating a Token With Initial Minting
- Click "Create Token" from Token Manager or navigation
- Fill in token details (name, symbol, decimals, max supply)
- Click "Create Token"
- On minting screen:
- Click auto-fill button for your address
- Enter amount or click "Mint All Tokens"
- Click "Mint and Continue"
- Wait for transaction processing
- On success screen, choose next action
3. Creating a Token and Liquidity Pool
- Follow steps 1-7 from "Creating a Token With Initial Minting"
- On success screen, click "Create Liquidity Pool"
- Wait for LP preparation (or click skip)
- Complete liquidity pool creation wizard
Technical Implementation Notes
Smart Contract Integration
Token creation is handled through:
/src/services/smart-functions/token-manager.js
Function: createTokenTransaction({ name, symbol, decimals, maxSupply, tokenKind })
Parameters:
name: String (max 32 chars)symbol: String (max 5 chars)decimals: Integer (0-8)maxSupply: Number (formatted with token precision)tokenKind: Type of token (fungible)
Minting Integration
Function: mintTransaction(amount, tokenSCAddress) or mintWithAddressTransaction(amount, toAddress, tokenSCAddress)
Transaction Flow
-
Step 1 - Form Submission:
- Client-side validation
- Token parameters prepared
- Navigation to Step 2
-
Step 2 - Minting Setup:
- Optional minting configuration
- Address and amount validation
- Transaction submission or skip
-
Step 3 - Processing:
- Transaction sent to blockchain
- Real-time monitoring via
monitorTransaction() - Hash retrieval and display
-
Step 4 - Success Handling:
- Transaction confirmation
- Next step options presented
- Token data stored
-
Step 5 - LP Preparation (Optional):
- 8-second countdown
- Automatic redirect to LP creation
- Token data passed to LP wizard
State Management
- Multi-step Form State: Maintains data across wizard steps
- Transaction Tracking: Monitors blockchain transaction status
- Conditional Navigation: Dynamic next steps based on user choices
- Error Recovery: Ability to retry on transaction failure
User Experience Features
- Auto-fill Options: Quick-fill buttons for common values
- Clipboard Integration: Paste functionality for addresses
- Real-time Validation: Immediate feedback on input errors
- Smooth Animations: Framer Motion transitions between steps
- Progress Indication: Clear visual feedback at each stage
- Multi-language Support: i18next integration
Security Considerations
- Input Sanitization: Prevention of special characters in critical fields
- Max Supply Limits: Validation to prevent unrealistic values
- Address Validation: Ensures valid blockchain addresses
- Transaction Verification: Hash verification for all operations
- No Private Key Handling: All signing done through wallet extension
Special Features
Mint All Tokens Button
- Automatically fills the amount field with max supply value
- Ensures all tokens are minted in initial step
- Formats number according to token decimals
Auto-fill Address Button
- One-click fill with connected wallet address
- Eliminates manual address entry errors
- Clear visual indicator when filled
Smart Warnings
- Alert when trying to create LP without minting
- Warning about irreversible max supply
- Notice about decimal precision impact
Responsive Design
- Mobile-optimized wizard interface
- Touch-friendly form controls
- Adaptive button layouts
Common Use Cases
1. Project Token Creation
- Create token for new project/DAO
- Mint initial supply to project wallet
- Create liquidity pool for trading
2. Reward Token
- Create token with specific decimals
- Skip initial minting
- Distribute tokens gradually via Token Manager
3. Testing Token
- Create token with small max supply
- Mint all tokens immediately
- Test without creating LP
Current Limitations
- Only fungible tokens supported
- Max supply cannot be changed after creation
- Maximum 8 decimal places
- Name limited to 32 characters
- Symbol limited to 5 characters
- No support for token metadata (images, descriptions)