Creating a Liquidity Pool
Overview
The Create Pool workflow allows token creators to list their tokens on the exchange by creating a liquidity pool paired with KLV. This multi-step process guides users through generating a pool address, creating LP tokens, adding initial liquidity, locking tokens, and enabling trading.
Step 1: Generate Pool Address
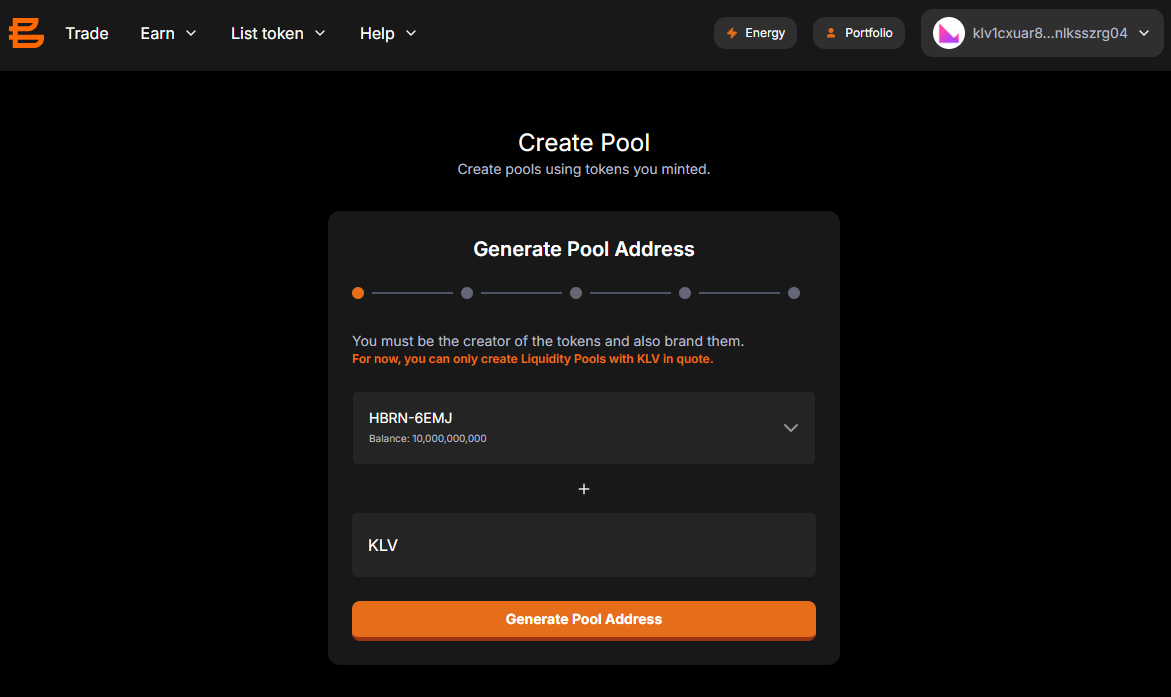
Page Header
- Title: "Create Pool"
- Subtitle: "Create pools using tokens you minted."
Content
- Section Title: "Generate Pool Address"
- Progress Indicator: 1 of 5 steps highlighted
- Requirements Notice: "You must be the creator of the tokens and also brand them."
- Limitation Notice: "For now, you can only create Liquidity Pools with KLV in quote."
Token Selection
- Base Token Selector: Dropdown for selecting your token (e.g., "SBRN-HRH8")
- Balance Display: Shows available balance (e.g., "Balance: 1,000,000,000,000")
- Plus Icon: Visual separator between tokens
- Quote Token: Fixed as "KLV" (cannot be changed)
Action Button
- Generate Pool Address: Button to proceed to the next step
Step 2: Create LP Token
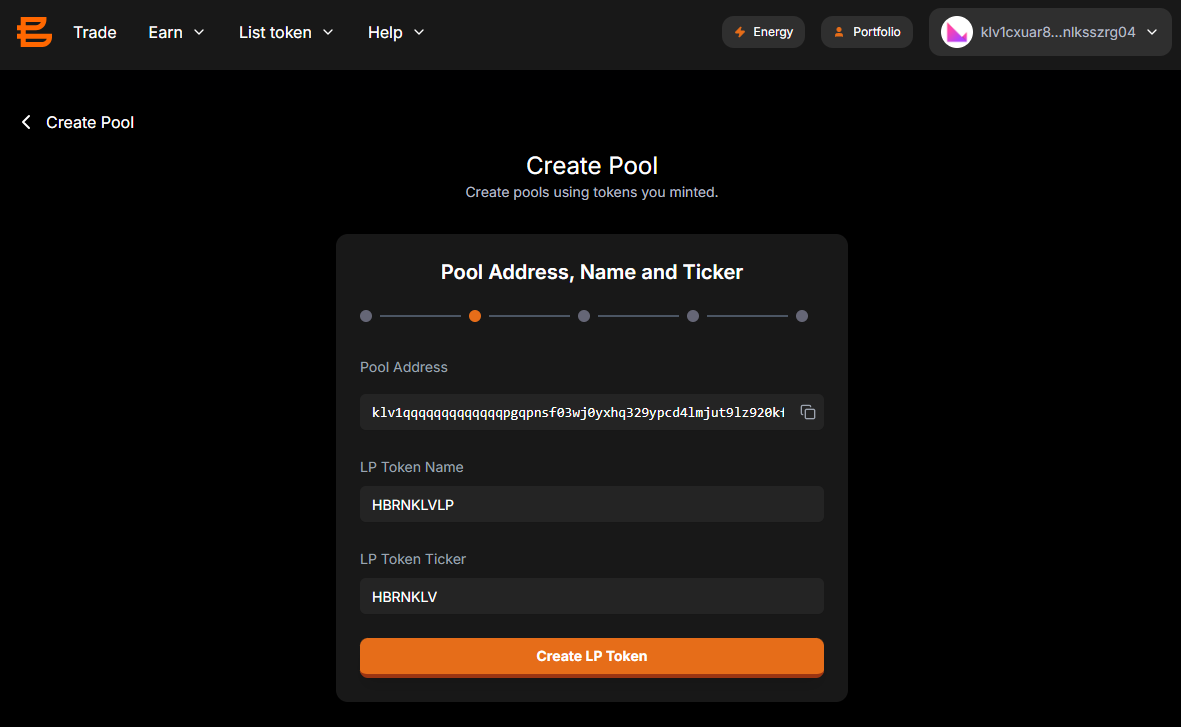
Page Header
- Navigation: Back to Create Pool button
- Title: "Create Pool"
- Subtitle: "Define the initial liquidity for your pool."
Content
- Section Title: "Create LP Token"
- Progress Indicator: 2 of 5 steps highlighted
Pool Information
- Pool Address: Generated smart contract address with copy button
- Example: "klv1qqqqqqqqqqqqqpgqnkew15pg4dekxdjpwpkxnvt7f1nw4q1hk"
LP Token Configuration
- LP Token Name: Input field for naming the LP token (e.g., "SBRNKLVLP")
- LP Token Ticker: Input field for setting the ticker symbol (e.g., "SBRNKLV")
Action Button
- Create LP Token: Button to generate the LP token and proceed
Step 3: Add Initial Liquidity
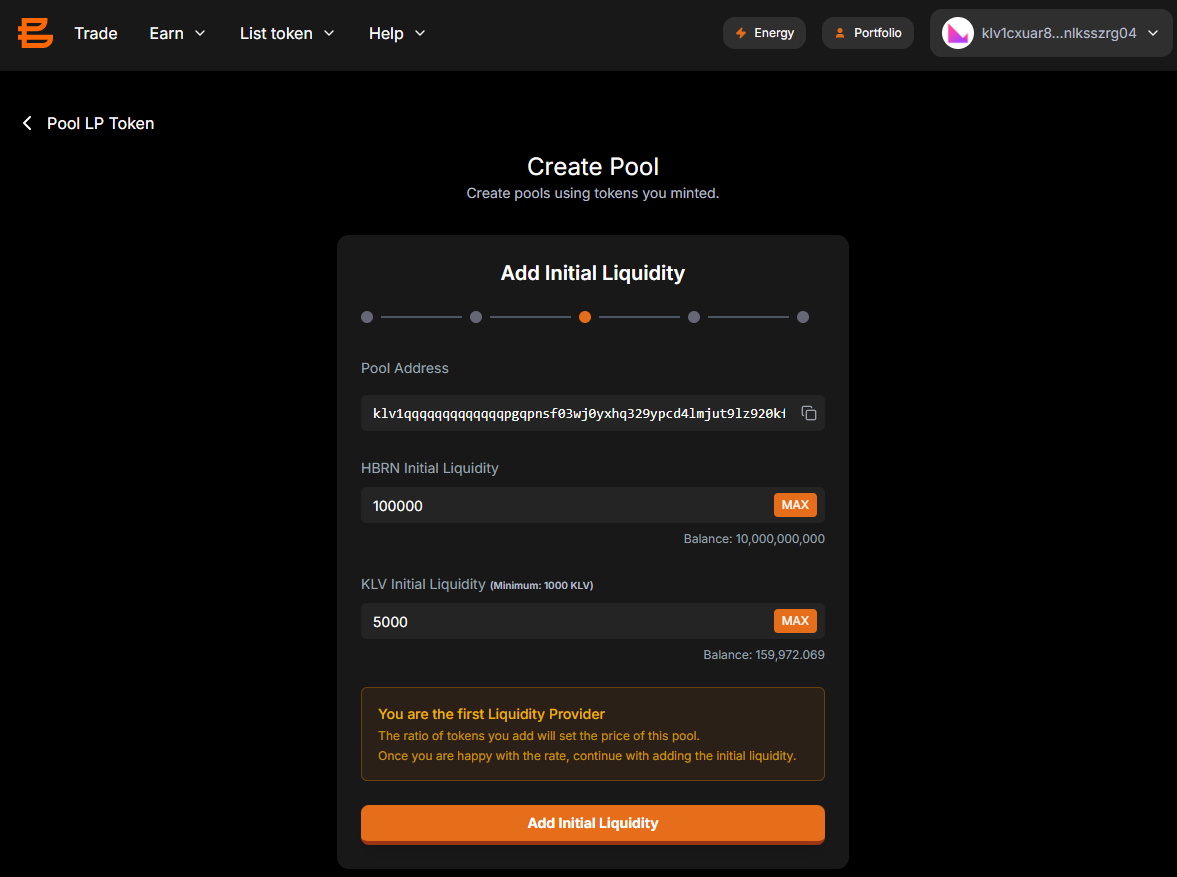
Page Header
- Navigation: Back to Pool LP Token button
- Title: "Create Pool"
- Subtitle: "Add initial liquidity to your pool."
Content
- Section Title: "Add Initial Liquidity"
- Progress Indicator: 3 of 5 steps highlighted
Pool Information
- Pool Address: Smart contract address with copy button
Liquidity Inputs
- Base Token Input: Amount of your token to add (e.g., "5000")
- MAX Button: Quick way to use maximum available balance
- Balance Display: Shows total available (e.g., "Balance: 1,000,000,000,000")
- Quote Token Input: Amount of KLV to add (e.g., "5000")
- MAX Button: Quick way to use maximum available balance
- Balance Display: Shows total available (e.g., "Balance: 135,002.713")
- Minimum Notice: Shows minimum required (e.g., "Minimum: 1000 KLV")
Important Notice
- First Provider Notice: "You are the first Liquidity Provider"
- Price Setting Notice: "The ratio of tokens you add will set the price of this pool."
- Continuation Notice: "Once you are happy with the rate, continue with adding the initial liquidity."
Action Button
- Add Initial Liquidity: Button to add liquidity and proceed
Step 4: Lock Liquidity
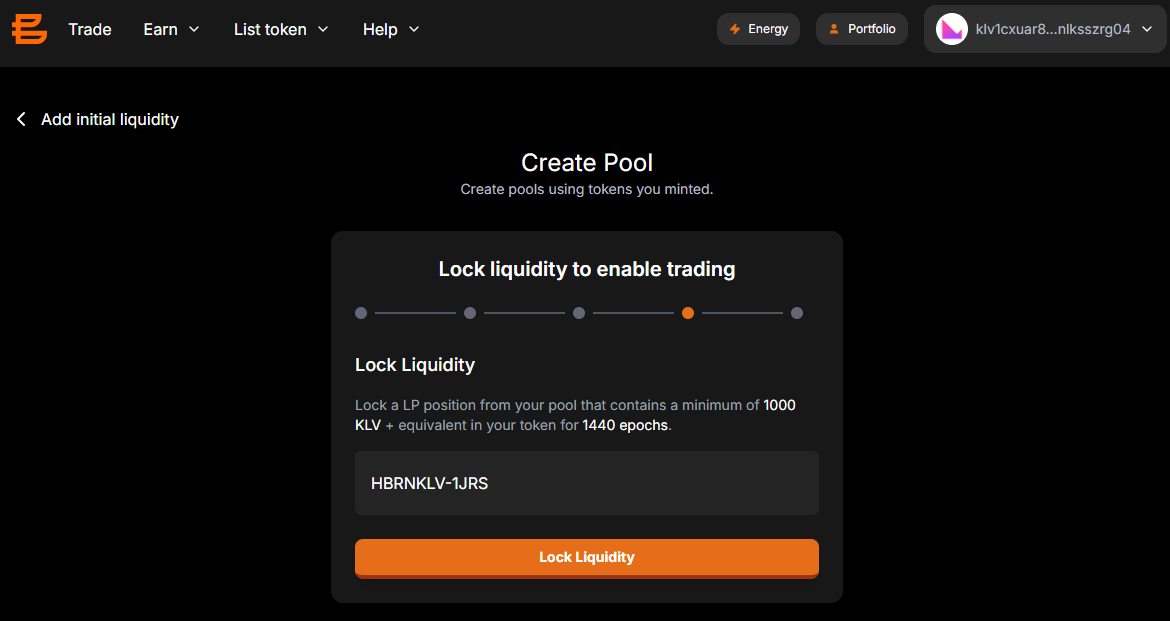
Page Header
- Navigation: Back to Add initial liquidity button
- Title: "Create Pool"
- Subtitle: "Lock liquidity to enable trading."
Content
- Section Title: "Enable Trade"
- Explanation: "Enable trade for pools that you created."
- Progress Indicator: 4 of 5 steps highlighted
Locking Instructions
- Lock Requirements: "Lock a LP position from your pool that contains a minimum of 1000 KLV + equivalent in your token for 1440 epochs."
- LP Token Display: Shows the LP token to be locked (e.g., "SBRNKLV-3AAV")
Action Button
- Lock Liquidity: Button to lock the LP tokens and proceed
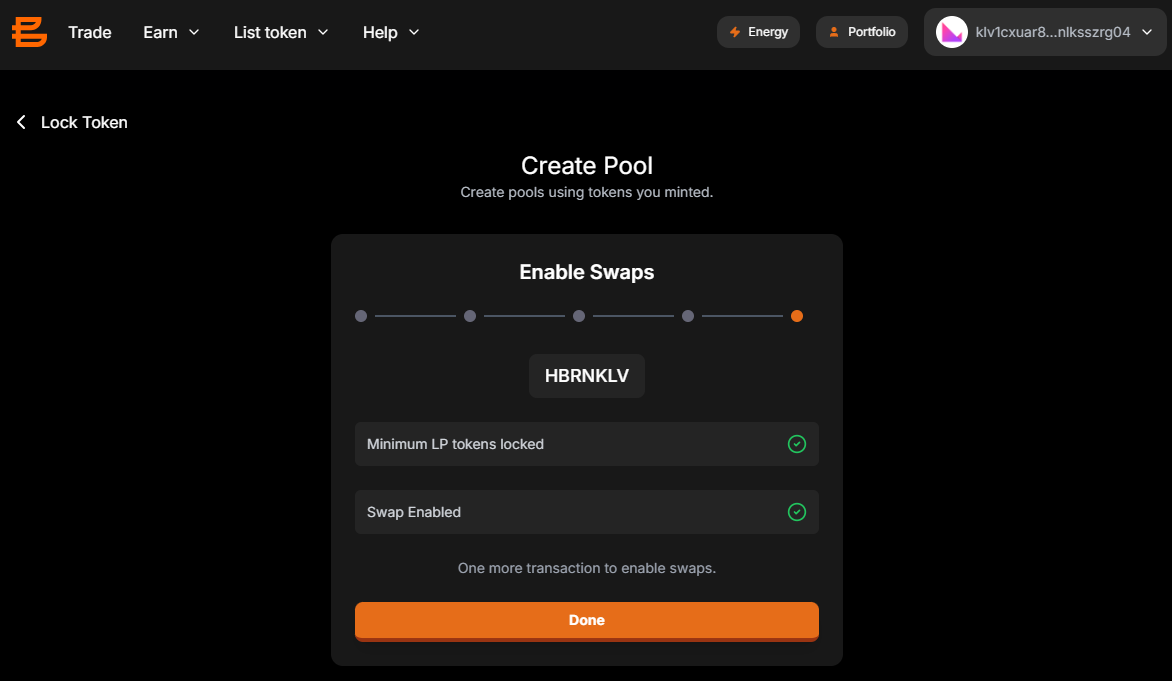
Step 5: Enable Trading
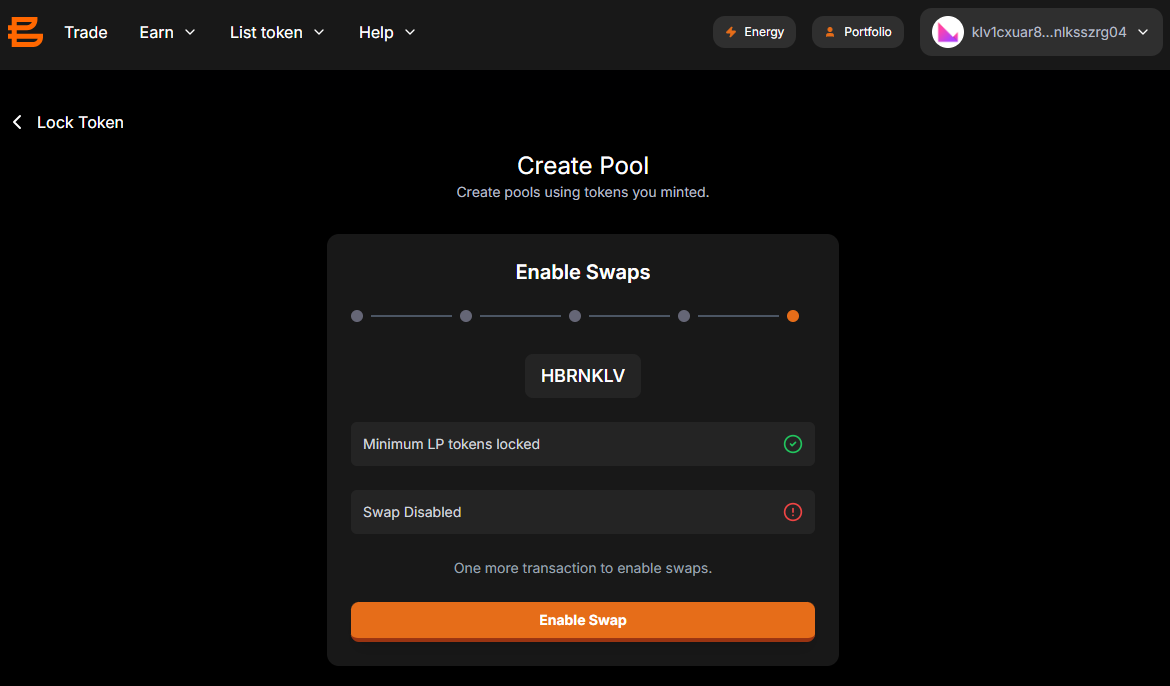
Page Header
- Navigation: Back to Lock Token button
- Title: "Enable Trade"
- Subtitle: "Enable swaps for your pool."
Content
- Section Title: "Enable Swaps"
- Progress Indicator: 5 of 5 steps highlighted (completion)
Status Information
- LP Token Display: Shows the LP token (e.g., "SBRNKLV")
- Status Checks:
- Minimum LP tokens locked: Green check mark (completed)
- Swap Disabled: Red circle (needs action)
- Action Required: "One more transaction to enable swaps."
Action Button
- Enable Swap: Final button to complete the process and enable trading
Technical Implementation Notes
Smart Contract Interactions
- Pool creation involves multiple on-chain transactions
- Each step requires wallet confirmation
- The process interacts with router and pair contracts
Token Requirements
- Users must be the creator/owner of the base token and have permission to set ito prices
- Token must meet minimum requirements for listing
- Currently, only KLV-paired pools are supported
Security Measures
- Liquidity locking period ensures initial stability
- Minimum liquidity requirements prevent low-quality listings
- Multi-step process reduces the risk of errors
User Experience Considerations
- Progress indicator helps users track completion
- Clear instructions at each step
- Copy buttons for technical addresses
- MAX buttons for convenient input